

Android dominates the global mobile OS market with well over 2.5 billion active users—making Android app development an unmatched opportunity for developers and businesses to reach massive audiences If you’re a beginner ready to build your first Android app—or aspire to launch a cross-platform mobile app—this guide introduces the top five steps you need to follow.
1. Set Up a Modern Development Environment
Begin by installing Android Studio, the official IDE backed by Google. It now supports Jetpack Compose, a Kotlin-based declarative UI toolkit that simplifies clean, adaptive app interfaces and integrates Material 3 across phone, foldable, and large-screen devices. Make sure to install the latest Android SDK, configure emulators for different form factors, and set up version control (Git) for proper code management—a best practice recommended even for beginners .
2. Learn Programming Languages & Cross-Platform Options
Kotlin remains the preferred language for native Android development, but Java is commonplace, especially in legacy and enterprise apps. Excitingly, Swift is now officially supported on Android, enabling cross-platform mobile development for Android and iOS with shared code . Additionally, beginners should explore frameworks like Flutter, Kotlin Multiplatform, and React Native—these tools help build modern Android and iOS apps more efficiently
3. Build Simple UI-First Projects
Start with a “Hello World” app or simple to-do list to grasp UI basics in Compose or XML Then advance to projects that use SQLite, fetch JSON data via REST APIs, access device features such as the camera or geolocation, and develop offline-first architecture using service workers in PWAs These steps help you build the muscle memory needed for scalable, feature-rich Android apps.
4. Integrate: AI, 5G, AR/IoT & Security
To be future-ready, infuse your projects with trending technologies:
AI & Machine Learning: Use on-device ML and AI-powered chatbots for personalization and smart experiences
5G Optimization: Add features like augmented reality overlays, live streaming, and fast synchronization .
AR/VR & IoT: Implement ARCore visualizations or integrate with IoT devices for smart connectivity .
Cross-Platform Swift & Kotlin Multiplatform: Share logic between Android and iOS, reducing development time.
Security & Privacy: Adopt encrypted storage, biometric authentication, and follow best practices using Android 16’s improved privacy APIs
Benefits Of Android App Development
10 min read · Last updated: May 2026
There are lots of benefits associated with the android app development for beginners These benefits tempt application developers and users and choose Android-powered mobile applications. Understanding the benefits is the main art development day that will help you work better for yourself. Various benefits include :
- Android application development is easy to adopt because it runs mainly in Java programming language. And it is widely used by programmers today.
- Android application inherits ownership of multiple sales channels as it can be implemented in many different ways, which eliminates the need to rely on more than one market. Rather, Android developers can sell over their own website or contact the third party.
- It is easy to integrate Android applications with various business processes, allowing easy customization of the entire platform tools by integrating your application with ease.
- Android is an open-source offering update that is an open-source technology interface and application framework. There is a big community working on the development of Android platform tools and technology.
- Android is known for its low barrier to entry and simply requires low-cost i9nvestment and is determined to provide relatively high ROI.
Steps To Android App Development For Beginners
Download Android Studio
An IDE or integrated development environment is required for programming in most languages. Android Studio is the most widely used IDE for Android development.
Google is the name behind the android studio. Simply download it and start using it. IDE gives the main user interface for the app where you are going to enter the code. You are not going to type it in notepad.
It will also identify errors and blunders in the process that you are making. It offers great suggestions and allows operate and running of your developed apps smoothly in a convenient manner.
Android studio makes files that you require and gives basic layouts, saving lots of effort as well as time.
Below you can see in an image where you can download an android studio.
Android Studio is for the development of Android.
There are some other IDEs too that work differently and support other app developments as well apart from Android. After downloading and installing Android Studio, you need to go to step two.
Setting Up The Android Studio
Android is one of the largest and fastest-growing mobile operating systems in the world, powering over 3.3 billion android devices across more than 190 countries. With a dominant presence in the mobile devices market, Android applications have become essential for developers and businesses alike. The Google Play Store, the official marketplace for Android, remains the largest app store globally, both by number of apps and downloads. In fact, the number of apps on Google Play is expected to reach 3.95 million in 2025.
Given that approximately 75% of smartphones run on Android, there’s no better time to create your first Android app. Whether you aim to create an Android app using Java or Kotlin, or explore tools like Android Studio (a leading integrated development environment (IDE)), the ecosystem is rich with resources. The Android SDK (Software Development Kit) provides everything you need to get started, from testing tools to essential APIs. Related: hire dedicated Android developers.
The Android platform supports a wide array of technologies including Progressive Web Apps (PWA), offline-first architecture, hybrid mobile apps, AI-powered mobile apps, and augmented reality apps. Developers can optimize performance through mobile app performance optimization, local data storage, data synchronization, conflict resolution, and service workers to enhance the user interface (UI) and improve app efficiency.
Thanks to innovations like Flutter app development, Kotlin Multiplatform, and cross-platform development, building for both Android and iOS has become more
- Android Studio is an IDE. It gives an interface for coding.
- The code you will write in Java –JDK (Java Development Kit)
- SDK is accessible by java code for the procedure to go further
Below is the welcome screen you’ll see after installing android studio.

Start A New Project
When samples are ready, go back to the first page where the loading of Android Studio takes place. Choose Start a new Android Projectand enter the name of the app with the company domain.
This will combine to make the package name in this format:
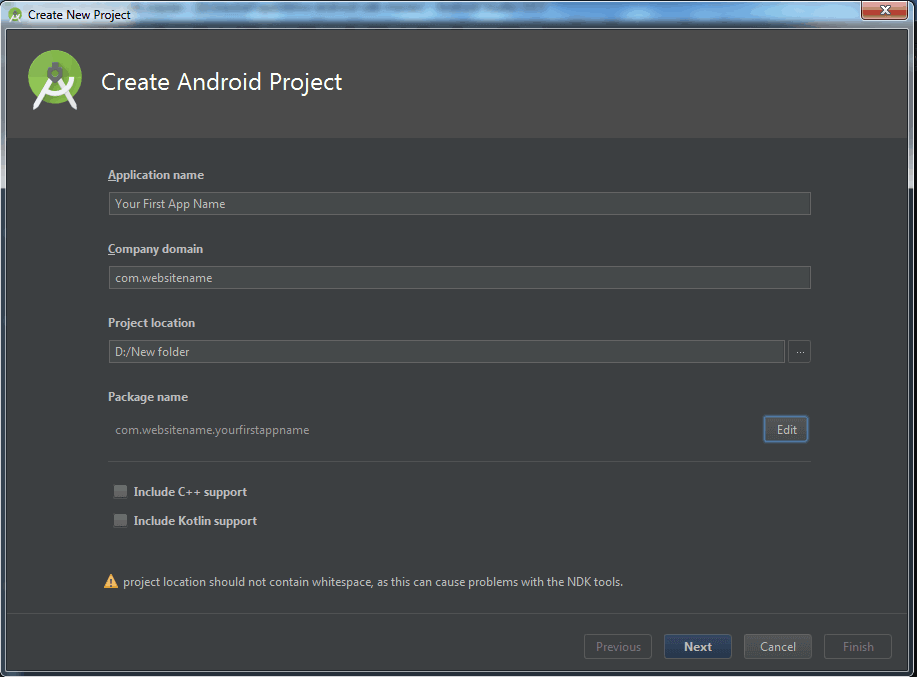
The package will become the complied file known as APK (Android Package File) and the uploading will be done on the Play Store.
Avoid using comic or funny phrases and words. The last field is the directory which has all files related to the app.
It is wise to have a backup of the code so you can save online. Then choose the device type for which you are going to develop the app. Select Phone and Tablet option among other options like TV, Wear, and Glass. In the beginning, it is good to stay limited to phones and tablets.
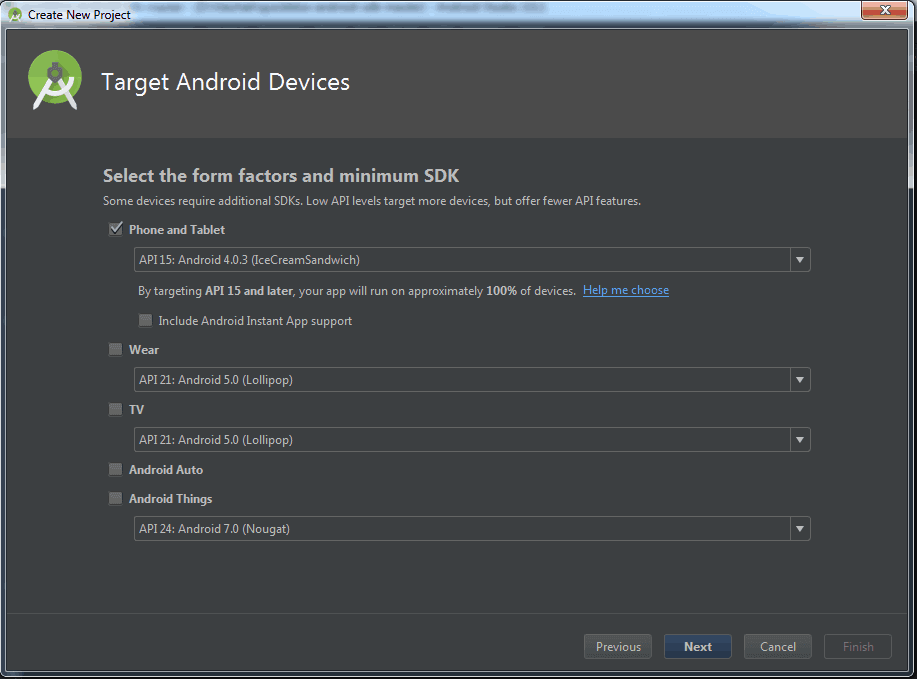
Minimum SDK is another option that is beneficial. It is the lowest Android version that it supports. Don’t select the latest Android version here because all Android users may not have the updated version of Android.
Choosing the default option is also fine. On the next page, there is an option to choose the way the app looks in the beginning. Related: mobile app development.
It is the main Activity Module. It is the main page of the app. Here you can decide whether the app title will remain on top of the screen or user interface will fill the whole page.
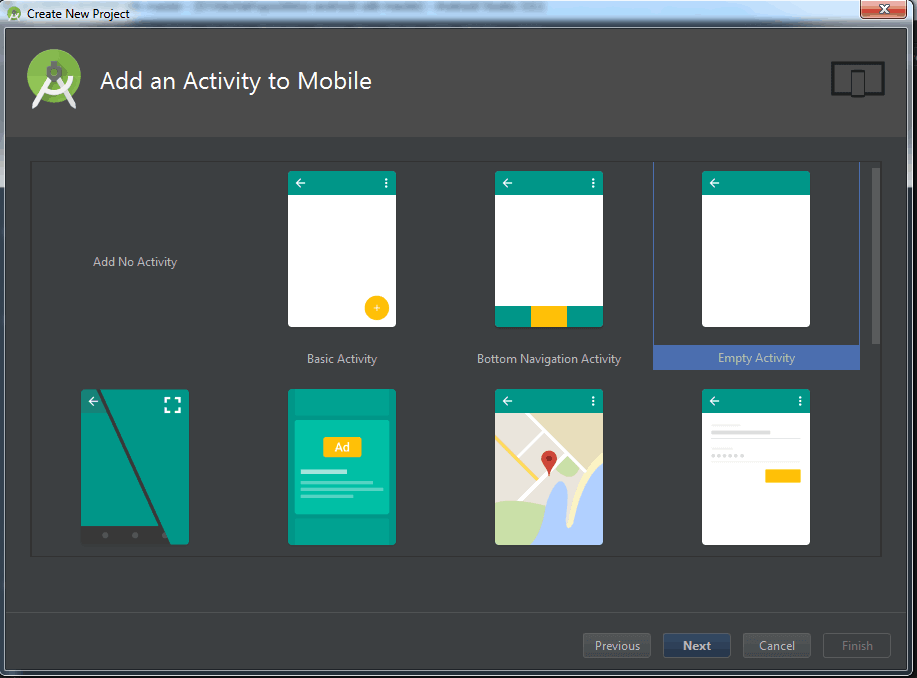
Since you are a beginner, it’s better to start off with something simpler and sleek. Choose Basic Activity or Empty Activity. This will be your android application.
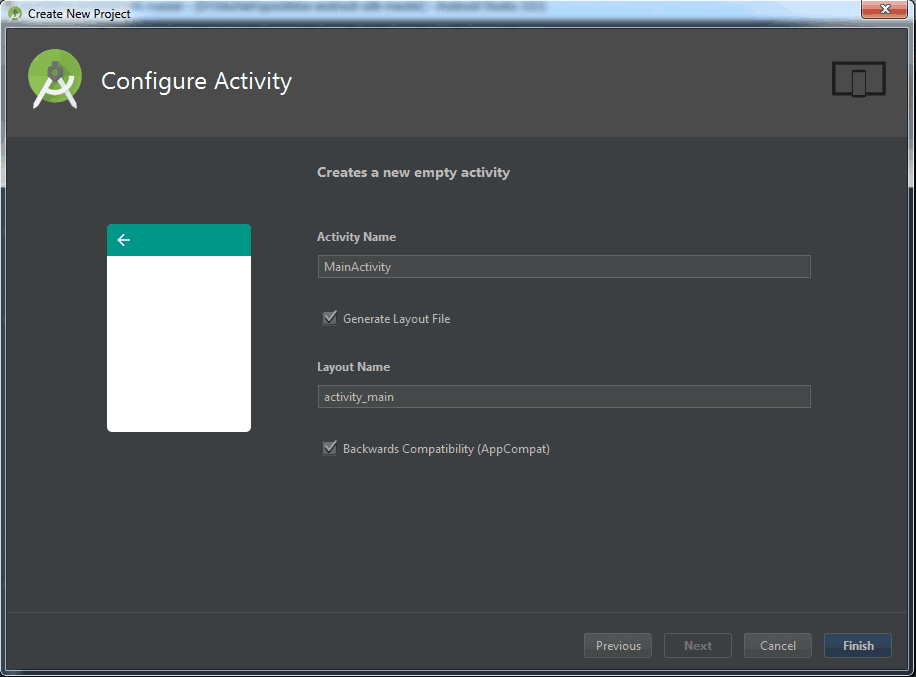
Go to Next for the last few options. Now, choose the name that you would like to give to your activity. Also, choose layout names like ‘Main Activity’ or something that makes sense.
The layout name will determine the layout of the activity. It’s a separate code that runs with the main activity code. It helps to define where menus and images go and the usage of fonts.
Creating A Real App
When starting your Android app development journey, especially if you’re planning to create your first Android app, using a robust integrated development environment (IDE) like Android Studio is key. Once you install Android Studio, you’ll notice a directory tree on the left showing all relevant files and folders of your project, a hallmark of a professional IDE for Android app development. At the center, a preview of your layout appears on a mobile device screen, often displaying a simple “Hello World” message.
If you chose Basic Activity, you’ll see both activity_main.xml and another XML layout file. Rather than pure XML code, Android Studio offers a visual editor, similar to open source web development tools, allowing you to drag and drop UI elements and customize the user interface (UI) efficiently. You can delete the “Hello World” widget, change a button’s ID to button1, update the text to “Hello,” and modify its color and size—all without advanced android programming knowledge.
This visual editor supports a variety of app styles, whether you’re building android applications for android devices running the Android operating system, or targeting cross-platform development for Android and iOS. The environment is ideal for working with Java or Kotlin, and integrates the android SDK and software development kit tools for full control.
Modern apps often leverage technologies such as Progressive Web Apps (PWA), Offline-first architecture, Hybrid mobile apps, and AI-powered mobile apps. You can implement features like local data storage, data synchronization, conflict resolution, and service workers to enhance app performance. With the right configuration, your app can even support offline-first capabilities and function across both Android and iOS platforms.
Using platforms like Flutter app development and Kotlin Multiplatform, or tools like a no-code app builder, beginners can quickly launch apps to the Google Play Store. These apps are optimized for mobile app performance optimization, supporting future-forward experiences such as 5G mobile experiences and augmented reality apps. Whether you’re creating a simple tool or a feature-rich solution, publishing your app on Google Play has never been more accessible or more important.
Add Code And Run The App
To begin Android app development, open MainActivity.java—this is where you define the behavior of your android applications. Whether you’re developing for Android and iOS using cross-platform development tools or sticking to native development, this step is crucial. Inside MainActivity.java, add the following passage of code to implement functionality for your ui elements:
This void buttonOnClick method ensures that when a user clicks the button in your user interface (UI), it will dynamically change its text. At the top of the file, locate or manually add the line import android.widget.Button;. It should appear automatically, but you can include it manually if needed.
Next, navigate to the content_main.xml file. Select the button widget and assign the OnClick function you just wrote from the drop-down menu. This action links the button to your backend logic, essential for all mobile devices powered by the android operating system.
Click “Run App” to build and deploy the project. Choose your AVD (Android Virtual Device) from the emulator list. This process is part of the integrated development environment (IDE) provided by Android Studio, which you must install to build your apps efficiently.
Whether you’re using java or kotlin, Android Studio includes the necessary android SDK, software development kit, and programming languages for building apps. It’s the leading IDE for Android app development, great for those who want to create an Android or create your first Android app. You can easily publish your app to the Google Play Store, and it will appear as an app on Google Play.
For developers building advanced apps like Hybrid mobile apps, Progressive Web Apps (PWA), or AI-powered mobile apps, features such as offline-first architecture, local data storage, data synchronization, conflict resolution, and service workers are essential. These features allow for seamless performance even without an internet connection, enhancing mobile app performance optimization.
Modern development also benefits from innovations like Kotlin Multiplatform, Flutter app development, and no-code app builder platforms, helping you build cutting-edge experiences like 5G mobile experiences and augmented reality apps. With Android’s open source flexibility and powerful tools, developing for android devices has never been more accessible or scalable.
Wrapped Up
Here we have tried to make android app development easier. Let us know about your beginning with android app development and also how this guide of android development for beginners helped you.
Echoinnovate IT is a custom software development company that makes creative apps and websites. Our expert team of developers can help you with your app and web development. So, Contact Us Today!
Frequently Asked Questions
You need a computer, Android Studio (the official IDE), and basic knowledge of Java or Kotlin programming.
The key steps are:
Set up Android Studio
Learn Java/Kotlin basics
Understand Android components (Activities, Layouts, Intents)
Build a simple app
Test and publish your app
No, Android Studio includes an emulator for testing. However, real device testing is recommended for performance checks
Yes, you need to create a Google Play Developer account (one-time $25 fee) to publish apps on the Play Store.
Android apps that handle the real world — 24,000 devices and counting.
Kotlin, Jetpack Compose, Room, WorkManager, MLKit, in-app billing, Material 3 — we ship Android apps tested across the messy reality of OEM fragmentation. We know why apps that work on a Pixel crash on a Xiaomi (memory pressure, OEM background limits, locale bugs) and we engineer for the long tail. Stop building for ideal devices — build for actual users.


